Sitecore and Salesforce custom integration – Salesforce JWT bearer token generation

In this post I will explain my approach to the Salesforce – Sitecore integration. In fact code that is going to be described here can be used in almost every .net application.

Available Sitecore – Salesforce integration

Sitecore provides an integration to everyone who needs to synchronize the data between the Sitecore and Salesforce – the “Salesforce Connect” extension.

You can download it here: https://dev.sitecore.net/Downloads/Salesforce_Connect.aspx

If you do not know which version you should install, check it here (comatibility table): https://support.sitecore.com/kb?id=kb_article_view&sysparm_article=KB1000576

The natural question that probably comes to your mind right now is ‘why did not I use it when I had a need to connect to salesforce’ – this is a really good question.

The answer is – because available extension is focused on the syncing contacts between Salesforce and Sitecore, when in our case we just wanted to send some data to Salesforce and the synchronization was being made on the different level.

In other words, available extension did not meet our needs.

Few general words about the integration

Integration with Salesforce is not in any kind special – it is just an API that is managed by the Salesforce developers. An endpoints and parameters can differ but the common thing is token generation that I decided to describe in this post because it took me a while to understand how to generate the correct JWT bearer token that will be honored by the Salesforce endpoint.

Documentation about it is available on the Salesforce help portal : https://help.salesforce.com/s/articleView?id=sf.remoteaccess_oauth_jwt_flow.htm&type=5

Documentation contains the Java code that I had to transform into .NET one what sometimes was not so obvious.

What do you need to generate OAuth 2.0 JWT bearer token

To make communication possible you must have generated certificate that is going to be used by Salesforce and your Sitecore instance. When certificate will be installed on the Salesforce side you can continute configuration on your side.

To generate the JWT token you need to gather the following information:

  • iss – this is OAuth client_id (provided by Salesforce)
  • aud – this is authorization server’s url (login.salesfroce.com for production and test.salesforce.com for test environments – provided by Salesforce)
  • sub – the username of account used to connect to salesforce (usually email – provided by Salesforce)
  • exp – timestamp of the expiration (provided by Salesforce)

Generation process

All of that data need to be later encoded to base64 string:

private string GenerateClaimsString()
{
var iss = this._salesforceConfigurationService.GetJwtClaimsIss();
var sub = this._salesforceConfigurationService.GetJwtClaimsSub();
var aud = this._salesforceConfigurationService.GetJwtClaimsAud();
var exp = this._salesforceConfigurationService.GetJwtClaimsExp();
var claims = $"{{\"iss\": \"{iss}\", \"sub\": \"{sub}\", \"aud\": \"{aud}\", \"exp\": \"{exp}\"}}";
return this.Base64Encoder(claims);
}

But it is not only encoding by the standard Convert.ToBase64String method. We must also remove some of the chars from the generated string:

private string Base64Encoder(string valueToEncode)
{
byte[] valueToEncodeAsBytes = System.Text.Encoding.UTF8.GetBytes(valueToEncode);
return Convert.ToBase64String(valueToEncodeAsBytes).TrimEnd('=').Replace('+', '-').Replace('/', '_');
}

When the values are encoded and unwanted chars are removed from the encoded string we need to add to it predefined JWT header. Header has a very similar structure to the claims and can be hardcoded with value:

"{\"alg\":\"RS256\"}"

Here is the code that can do that:

private string GenerateJwtHeaderString()
{
var headerValue = SalesforceConstants.Api.Values.Header;
return this.Base64Encoder(headerValue);
}

After all operations we have two strings that we can use to build the assertion used later in the authorization request.

var assertion = this.GenerateJwtHeaderString();
assertion += ".";
assertion += this.GenerateClaimsString();

As you can see two strings are again connected with the dot sign.

But this is not the end – now we are going to use our certificate to sign the assertion. Full code of assertion generation will look like this:

var assertion = this.GenerateJwtHeaderString();
assertion += ".";
assertion += this.GenerateClaimsString();
this._assertion = assertion + "." + this.SignAndGeneratePayloadString(assertion);

Where SignAndGeneratePayloadString method looks like this:

private string SignAndGeneratePayloadString(string payload)
{
            X509Certificate2 certificate = new X509Certificate2(this._salesforceConfigurationService.GetCertPath(), this._salesforceConfigurationService.GetCertPass(), X509KeyStorageFlags.MachineKeySet | X509KeyStorageFlags.PersistKeySet | X509KeyStorageFlags.Exportable);
            using (var privateKey = certificate.GetRSAPrivateKey())
            {
                var signedData = privateKey.SignData(System.Text.Encoding.UTF8.GetBytes(payload), HashAlgorithmName.SHA256, RSASignaturePadding.Pkcs1);
                return Convert.ToBase64String(signedData).TrimEnd('=').Replace('+', '-').Replace('/', '_');
            }
}

As you may noticed SignAndGeneratePayloadString method uses certificate to ‘sign’ the assertion data – to make it work you need to load the certificate from the disk (it must be p12 certificate file) and have certificate password to read it.

The result of signing is again concatenated with the dot and original assertion data.

When the assertion is finally ready, you can authenticate with Salesforce API and Request Access Token for further Salesforce communication.

Summary

If you compare implementation from this blog post with implementation from the Salesforce’s help page you will notice few major differences like:

  • usage of p12 certificate file instead of jks
  • additional string operations on the generated/encoded string values

If you want you can check the full implementation here: https://github.com/lskowronski/SitecoreSalesforce/blob/main/SalesforceJwtService.cs

Because transition from JKS file to p12 file can be also tricky, I will describe it in the another blog post that is going to be published soon – stay tuned!

What to use to write Unit Tests for Sitecore?

In this post, I would like to share with you some experiences I had in my last project and give you advice on what you can use to write Unit Tests and why sometimes some of the libraries are not a good way to go.

In the most cases when the team is thinking to start writing unit tests there is an discussion about different approaches and available libraries – been there done that.

Let me tell you my story

In our case, we had the following libraries taken into consideration:

  • NUnit vs XUnit
  • NSubstitute vs Moq
  • Asserts vs FluentAssertions
  • FakeDB

We totally forgot about AutoFixture and that was our mistake!

After couple of meetings (we had several teams that had to agree something) we decided to vote and the winners were:

  • NUnit
  • Moq
  • FluentAssertions
  • FakeDB

Of course, you may ask “why” … the answer is usually simple because team members knew these three or just liked to write unit tests with the support of these libraries than others.

Is this logical – in some way yes. Is it professional – some people may say ‘no’ but this is how real-world works. Software developers tend to use libraries that they know – especially when it comes to writing unit tests – even when there are better solutions out there.

Everything was fine at the beginning…

We started to write tests, we had around 100 test cases and then we realized that we need something to generate fake Sitecore items automatically.

We started to play we AutoFixture library and then we realized that we made a mistake …

AutoFixture was working really good with all of the libraries instead of FakeDB. We were able to generate simple types like strings etc. but no items were added to the FakeDB.

After some digging in google I found out that many people had that issue and there are two repeated solutions:

  • switch into XUnit
  • get rid of FakeDB and prepare your own fake objects

For us was too late – we decided to stay with our setup.

What to use – the answer

Based on my experience I would not start writing unit tests for Sitecore with NUnit in the future.

The rest of the listed libraries seem to be pretty safe and good from my point of view.

So the answer is:

Use XUnit and whatever else you want – but not NUnit because it can block you at some point as blocked me.

Sitecore SPEAK DatePicker issue with date selection

In this post I describe how to fix/workaround the issue with DatePicker component in Sitecore SPEAK 2.

Usually, DatePicker works just fine but at some point we noticed that something wrong is happening with date selection …

I identified two issues:

  • when we click the date in calendar it selects today rather than selected date
  • when we click the date in calendar it shows that we selected the date but value is set for today’s date not one that is shown

It might be related to the fact that I had to DatePicker components on a single page. Also, it might be related to the custom format of data that we use in the DatePicker – dd/MM/yyyy.

After some checks I decided to overwrite the vanilla DatePicker javascript with changed one.

Javascript file is in the path:

/sitecore/shell/client/Business Component Library/version 2/Layouts/Renderings/Common/DatePickers/DatePicker.js

I fixed it by adding ‘global’ variable to store set value: “definedDate”

Then I use that variable in two places.

First one is formatDate function that is called usually after selection

Second one is inside getISODate where we use it to calculate correct date

That change solves the incorrect behavior of the form.

Sitecore’s Personalization under the hood

About two months ago I had a pleasure to conduct webinar about personalization but this time I focused on something that people usually skip.

I did not describe how to setup the personalization rules but I tried to explain

  • what does it mean to apply a good personalization
  • why it is beneficial to apply personalization (for customers and companies)
  • how it works under the hood (algorithms and calucations process)

If you are interested in details you can watch it here (click image – you must to enter your email in the form to see the video):

You can also check details of presentation on slideshare:

I hope you like it – if you want to discuss it, please use comments section or reach me via social media.

How to get the latest logs from Azure with Kudu

Before I will tell you how I want to describe to you why someone may need to use Kudu to get logs from Azure.

Of course, the best way to work with Sitecore logs (when it is installed as PaaS) is the Application Insights tool. But when it has to be disabled because of many different reasons we are forced to use good old files with logs.

An issue with log files is the fact that when a file is in use we cannot just download it from the server with FTP client because it is locked by IIS process. To access the latest data we must use Kudu tool – but it is not the most efficient way to find and open log file – especially when you have thousands of log files and Kudu does not allow us to sort the files by date to get that one you need.

How to find in Kudu lately updated files?

Let’s start with the opening of PowerShell tool in Kudu

Then by clicking or with command enter the directory with logs files.

cd "D:\home\site\wwwroot\App_Data\logs"

As a result, you will see the list of files with pagination – it means that in case of having thousands of files – to find the file is a nightmare. Thanks to PowerShell console, we can find the name of a file very quickly.

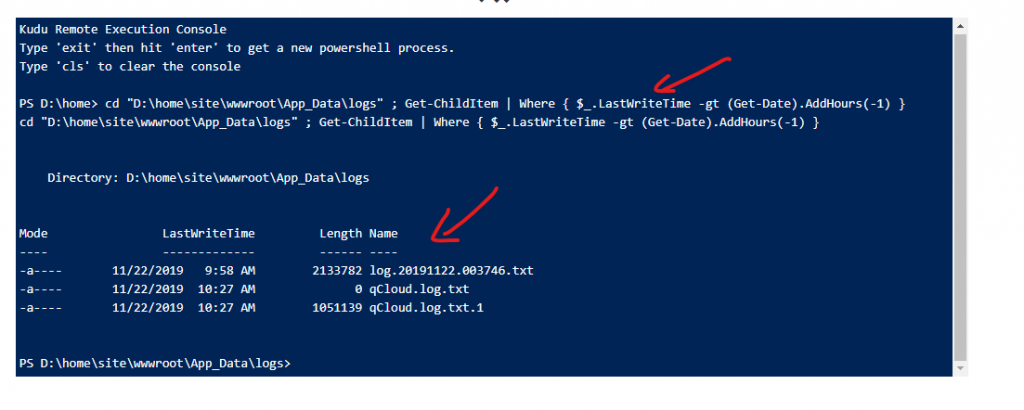
Run the following command to get files modified during last hour:

Get-ChildItem | Where { $_.LastWriteTime -gt (Get-Date).AddHours(-1) }

(you can run two commands at once, just use a semicolon between two of them)

As a result, you will see in a PS console a list of files names:

Now, to get the file you have to use Kudu’s URL (copy it from the browser) – get only a domain, then add the following path to it, with name of your file at the end:

/api/vfs/site/wwwroot/App_Data/logs/nameOfYourFile

In total you should receive something like this:

https://domainWithSCMinIT/api/vfs/site/wwwroot/App_Data/logs/nameOfYourFile.txt

Open it in the browser to get the latest data from the currently used log file.