Sitecore Customer Experience Maturity Model

For last few months I was looking for some free time to get into the “Sitecore Customer Experience Maturity Model”. Now I have found some time which I can spend on learning new stuff.

I have decided to prepare few posts about “Sitecore Customer Experience Maturity Model” but from technical person point of view. Why? Because in my opinion it is really important to understand why we (developers) spend so much time on preparing personalized Sitecore components which use xDB data.

When we are talking about Digital Maturity in context of Sitecore we should remember about many Sitecore publications and SBOS team.

Do you know this images?

Sitecore Customer Experience Maturity 
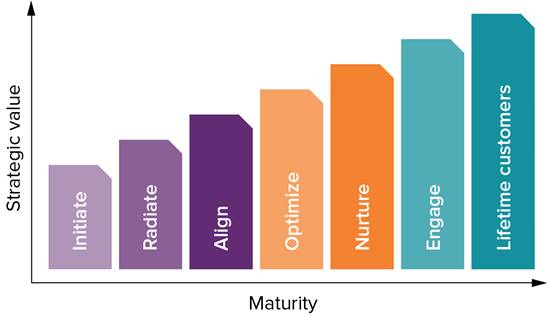
Chart from http://www.sitecore.net/getting-started/maturing-digitally/cx-maturity-model

Customer Experience Maturity Model

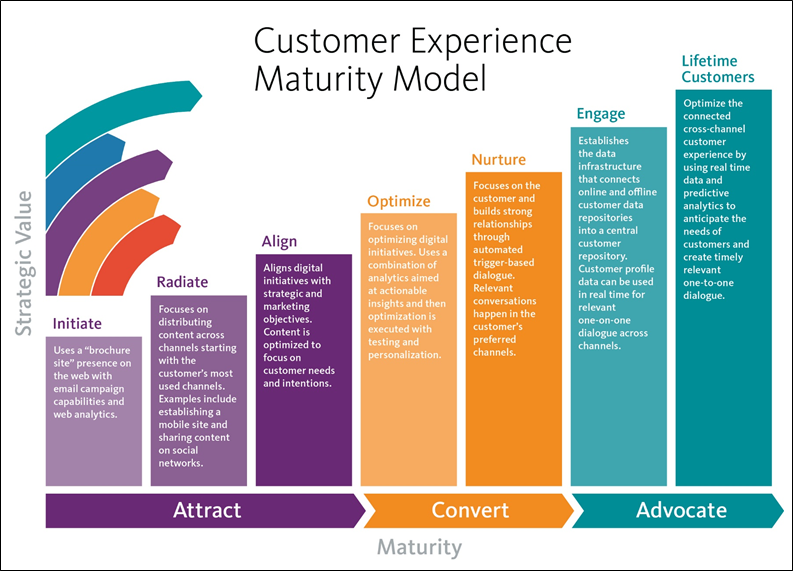
Chart from http://www.connecttheexperience.com/CX-Maturity-Assessment

On presented charts you are able to check all seven steps to Digital Maturity.

But what exactly Digital Maturity is? Well, in easy words we can say that Digital Maturity is a point on time in which you use all possible ways to know your clients and you serve to them personalized content on all possible channels.

If you want to check on which stage is your company currently, you can try to put your data into form on this page: http://www.connecttheexperience.com/CX-Maturity-Model

But if you have not seen that before you probably will have some problems with understanding of the results. So stay with me, here on my blog and remember :

YOU SHOULD NOT TRY TO SKIP OVER THE STAGES, YOU SHOULD MOVE THROUHG ALL OF THEM STEP BY STEP

I will try to write about all maturity stages with easy to understand examples – so follow my next articles.

Sitecore MVP 2017 – Technology

Yes! I have been awarded with Sitecore MVP!
I was working on it for last year and you know what – it is great that Sitecore noticed that in Poland people work hard for Sitecore Community.

In 2016 we had in Poland only one Sitecore MVP (Adam Najmanowicz – greetings!) but in this year Sitecore has distinguished three more people:
– Radek Kozłowski
– Alan Płócieniak
– and me

What is cool in being Sitecore MVP – I don’t have too much to write about it for now, but as I read in internal mailing from Sitecore in next few weeks all new Sitecore MVPs will recieve access to some internal stuff like pre-release versions of Sitecore and etc.

If you want to know how to become a Sitecore MVP and why it is worth to work with Sitecore, you should see my presentation from Sitecore Community Poland – “Find your own path with Sitecore”

Hopefully you will like my thoughts – if yes then you definitely should subscribe Sitecore Community Poland YouTube channel

What next?

I had a goal to become a Sitecore MVP. Now when I am Sitecore MVP I’m looking for new challenge – maybe I will try prove that it is possible to migrate from Sitecore Developer to Sitecore Digital Strategist? We will see soon – I promise!
More about Sitecore MVP program you can find here: Sitecore MVP

PowerShell – Stage 2

In this part of PowerShell topic I will show you how to create IIS website and unzip Sitecore into the new site directory.

Set site name

Before we will do a real job we have to define name of our new site. We can ask user in console to set the value. This code will prompt for name:

As result we will have name saved in variable $nameProvidedByUser.

Stop IIS

Because we have to add new ApplicationPool, create new IIS Site, sometimes also override some values in confiugration – it is better to stop our local instance of IIS before we will start.

We can do this with script:

After that definition we have to just call our function with command “IISStop”

Do some real work – define/copy/run

Ok, for now we have defined name and stopped IIS instance. We are ready to do some real work.

Run following command and at the end you will have ready to work IIS site and copied Sitecore files inside web root.

We have here code for:

  • unpacking ZIP files
  • changing the structure of unpacked files
  • creation of IIS AppPool
  • creation of IIS Site
  • creation of settings for bindings


But what exactly this command will do? Here you have explanation.

Inside this block of code we use some functions which were prepared before.

Add host to Windows file

If we want to define new site in our environment we also should add new definition in windows hosts file. We can do this with following script:

Start IIS

Because we have in plan to stop our IIS we also should have a script to start it again.

We can do this with following function:

Select version of Sitecore

Probably you will have more than one version of Sitecore in your files system – it means that would be nice to have an option to select which version of Sitecore should be copied into our web root. We can provide that feature with code:

What’s next?

In next part of PowerShell fun I am going to refactor code and set some settings like:

  • permissions
  • database connection strings

If you want to check how current version works you can checkout (and later also participate) code from my public repository on GitHub : PowerShell-automation

PowerShell – stage 1

I have decided to prepare some PowerShell scripts to automatize my work with Sitecore. In this and next articles with PowerShell in the name, you will find some resolved issues and some useful scripts as well.

The NAME

As you can noticed in the title – I wrote PowerShell not Powershell or powershell or anything else. You should also remember about correct name.

I do not know if you noticed how people very often write Sitecore in the wrong way. I mean examples like “SiteCore” – looks strange right?

That is why we should care about details.

Prepare your system to run PowerShell scripts

After some fun with inline PowerShell scripts you probably will decide to create your first file with PowerShell script. Then probably you will have following error:

File XXX cannot be loaded because running scripts is disabled on this system. For more information, see about_Execution_Policies at http://go.microsoft.com/fwlink/?LinkID=135170.

It means that you do not have enough permissions to run PowerShell scripts. You have to change that, for instance with following command (remember to open PowerShell Terminal in Administrator mode):

Set-ExecutionPolicy RemoteSigned

More about options you can find here: https://msdn.microsoft.com/powershell/reference/5.1/Microsoft.PowerShell.Core/about/about_Execution_Policies

Tools

To write/manage your PowerShell scripts you can use many tools. I have chosen Visual Studio Code. It’s simple, it’s for free and when you install PowerShell Extension it will have IntelliSense.