SPEAK 2.0 – STAGE 1

I have decided to create first ever tutorial for SPEAK 2.0 which will give you really working examples.

Why? Because I was not able to find any information about that and I was not sure which version should I choose for greenfield projects (1.2 or 2.0).

I hope I will be able to answer for all your questions in this and all future articles.

Do not hesitate to ask when you will have any additional questions.

Before we will start, please remember – if you want to work with SPEAK you have to:

  • work on core database
  • use Sitecore Rocks for Visual Studio

SPEAK 2.0 guidance

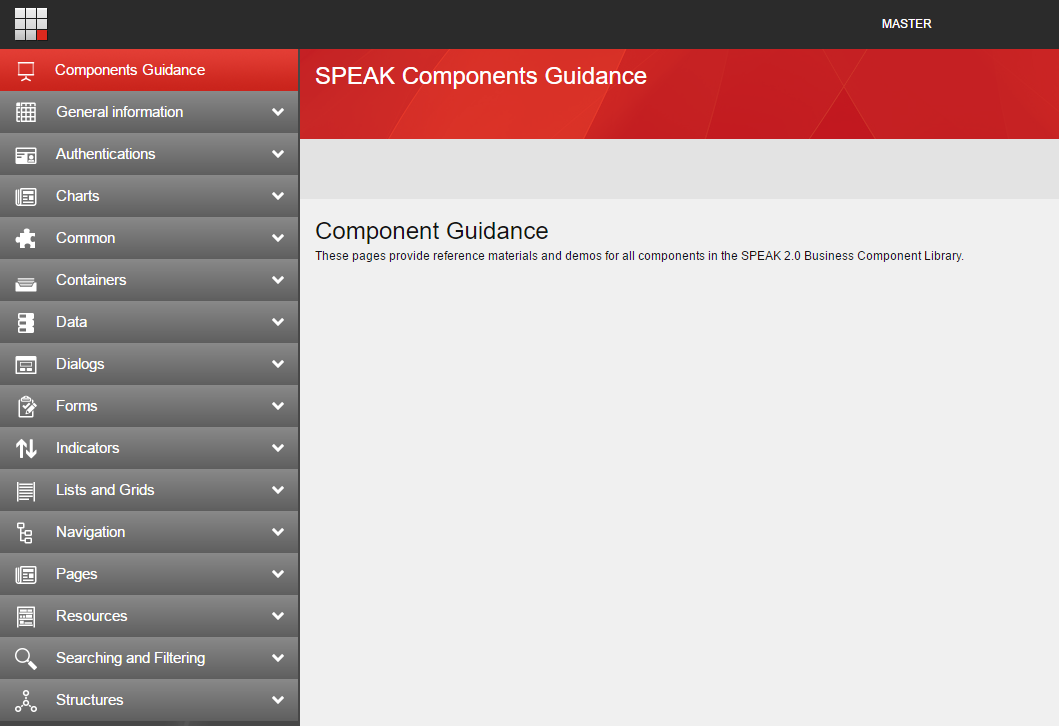
Sitecore with second verions of SPEAK provides us something new – the guidance. Inside core database under the path:

/sitecore/client/Business Component Library/version 2/Content/Guidance/Dashboard

We can find SPEAK application with all available SPEAK 2.0 components.

Application looks in the following way:

2016-08-13_16h08_54

Under the url

/sitecore/client/Business Component Library/version 2/Content/Guidance/AllComponentsList

we can see all available components but this time as a list. The number of components is really impressive. We can use following components:

Category Component Name
Authentications AccountInformation
Charts LineChart
Charts RadarChart
Charts AreaChart
Charts BarChart
Charts ColumnChart
Charts DoughnutChart
Charts PieChart
Common BackButton
Common Button
Common CheckBox
Common DropDownButton
Common DropList
Common GlobalLogo
Common HyperlinkButton
Common Image
Common ListBox
Common MessageBar
Common ProgressBar
Common SearchableDropList
Common Separator
Common ButtonTextBox
Common Text
Common TextBox
Common TextArea
Common ToggleButton
Common ChildRenderer
Common ItemRenderer
Common PageCode
Common RenderView
Common SubPageCode
Containers Border
Containers Expander
Containers Frame
Containers ScrollablePanel
Containers SubAppRenderer
Containers TabControl
Containers Popover
Data QueryDataSource
Data SearchDataSource
Data EntityDataSource
Data BaseDataSource
Data ChartDataSource
Data GenericDataSource
Dialogs ConfirmationDialog
Dialogs DialogWindow
Forms Form
Forms Uploader
Forms UploaderInfo
Indicators ArrowIndicator
Indicators ValueLabel
Lists and Grids Grid
Lists and Grids ListControl
Navigation Breadcrumb
Navigation Menu
Navigation NavigationToggle
Resources Pipeline
Resources Rule
Structures Page Structures
Structures Substructures

Sitecore also provides us a list of all available properties which defines the components behavior. List is available under the url:

/sitecore/client/Business Component Library/version 2/Content/Guidance/AllComponentProperties

It is really long list – so i will not paste it here.

SPEAK 2.0 page branches

In previous version of SPEAK we had possibility to use branches for faster creation of pages. We could find them under the path:

/sitecore/client/Business Component Library/version 1/Templates/Branches

Unfortunately they are currently not available for SPEAK 2.0.

That is why I prepared a branch for dashboard. You can download Sitecore package with this branch from here: SPEAK 2.0 Branches-1.0

Install this package in your Sitecore instance. If you will create a page with my template branch you will be able to see following page:

2016-08-13_16h56_25

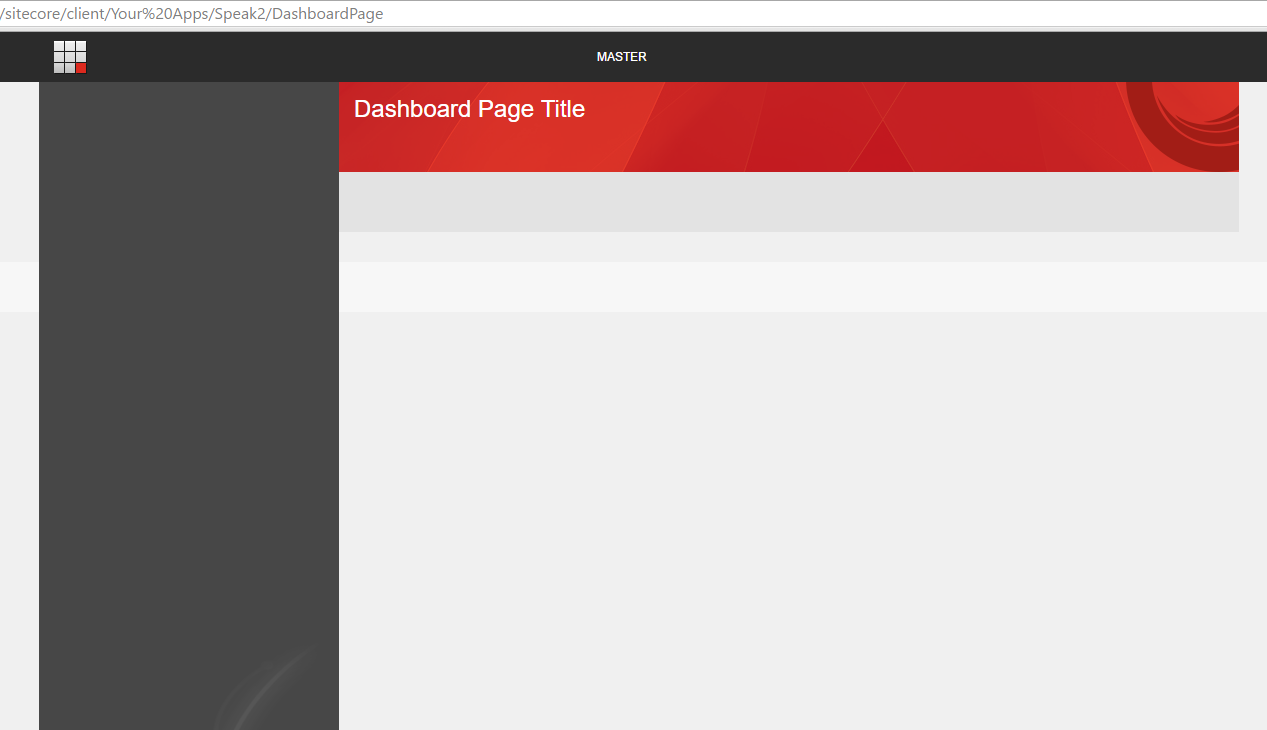
Nothing special – that’s right, but it is looking exactly the same as page created from SPEAK 1.2 template branch. If you will compare “Design Layout” definitions you will find many differences.

Your first SPEAK application in 4 simple steps

  1. Open Core database inside Sitecore Rocks 2016-08-13_20h18_44
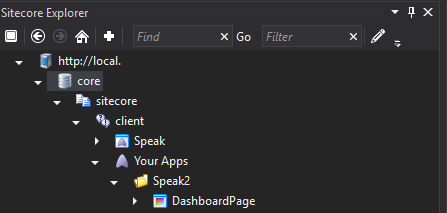
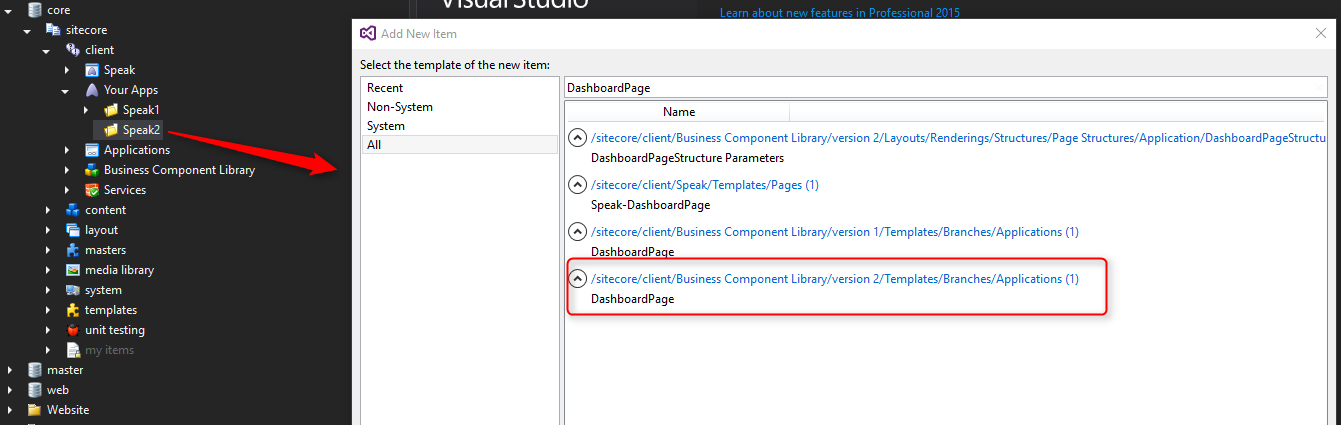
  2. Create your application directory under path “/sitecore/client/Your Apps” (my application name is “Speak2”)
  3. Add first item to your application – page which is based on DashboardPage branch from “SPEAK 2.0 Branches” package 2016-08-13_20h28_42As result you should see item with PageSettings item under your page item. 2016-08-13_20h32_11
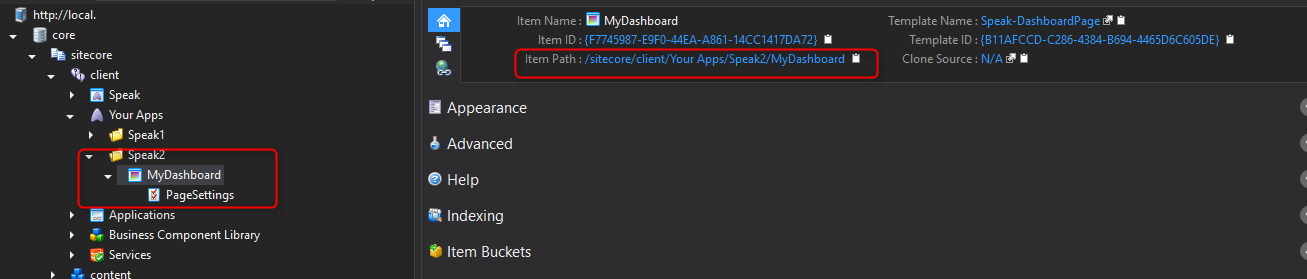
  4. Open your application in browser – use item path and paste it into the browser.

Congratulations – you have created your first SPEAK 2.0 application!

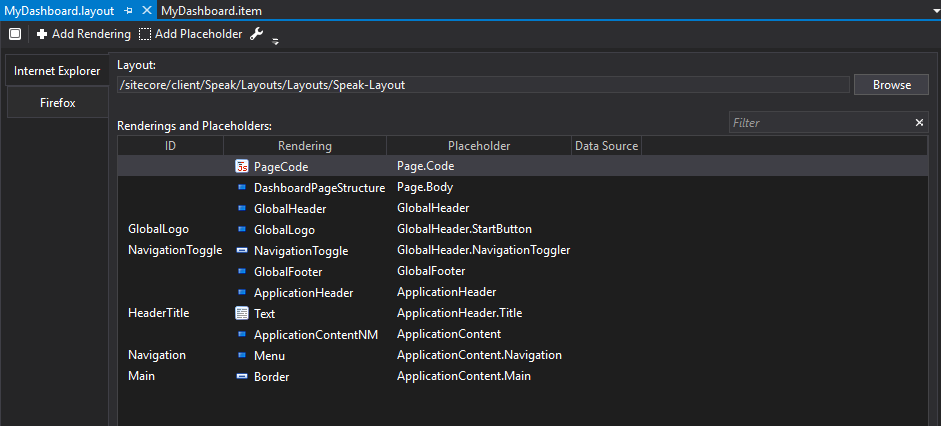
Check also “Design Layout” properties for your Dashboard item. You should have following renderings:

2016-08-13_20h37_47


What will be next?

In next article I will show you how to build SPEAK 2.0 application with ListControl.

More about SPEAK 2.0


Sitecore Community Poland – Second Offline Meetup

Success of Sitecore Community

What can I say. Second in Poland Sitecore Meetup is a fact.

If you work with Sitecore and you are in Poland you should be on 19 August in Wrocław.

If Wrocław is too far for you you should join to our communication channels because event will be transmitted online.

Dream Team

Again we will have three speakers:

Adam Najmanowicz (SITECORE MVP)

Adam will talk about: Sitecore PowerShell Extensions – From zero to hero – crash course

The basics of Sitecore PowerShell – where it can be useful and how to best utilize it in your day-to-day workflow. The audience will learn how to work with items and Sitecore API as well as how to build rich user interfaces with just a few lines of code and no server restarts. We will also see how to debug those easily and provide extensible Web APIs easily.

Learn more about Adam:

Adam’s background is in the Customer Experience Management (CEM/CMS/ECM) space, he worked with SharePoint and EPiServer as well as some bespoke CMS-es but now his focus is within the Sitecore space. He is a Developer (at heart) who heads up the .Net Practice at Cognifide. During his years in the industry he’s gathered substantial experience in a variety of frameworks besides Microsoft .Net, he’s tinkered with and hacked at Delphi, Java and a wide range of DBMS (Microsoft SQL Server, Oracle, Informix to name a few). Sitecore MVP since 2011.

Read Adam’s blog here: http://blog.najmanowicz.com/

Radosław Kozłowski

Radoslaw will talk about: Unicorn – synchronize easily.

Using Unicorn to synchronize Sitecore databases and resolve item deployment problems.

More information about Radek:

Passionate Sitecore & .NET developer and designer with a lot of professional Sitecore development experience. Worked with Sitecore since beginning of 2013, as a developer and afterwards, team lead developer. Sitecore community contributor, sharing his work, such as modules and packages, and his knowledge – with blog and community forum.

You should also check his blog: http://SitecoreCoffee.com

Wojciech Urban

Wojciech will talk about: Sitecore Habitat – make it smarter.

Presentation will be about Sitecore Modular Architecture which could give you some advantages in the future

More information about Wojtek:

Very energetic person, passionate of new technologies, Sitecore & .NET developer in Coders.Center. Wojtek started his journey with Sitecore in 2014. Since this time he was working on many international projects based on Sitecore with different approaches.

Registration

This time registration is mandatory. Please register here: registration link

Our Channels

I hope that we will be there together!

Speed Up Sitecore instance

All Sitecore developers know, that waiting for Sitecore load can be very annoying – especially when we do not have time.

In this post I’ve written about some tricks – but remember, they should NOT be used on the production environment.

Dynamic Compilation

About .net dynamic compilation you can read here: click

In simple words – everytime when you changing some code which has some references (let say inside class) all dll files should be recompiled and this process in bigger applications (like Sitecore) takes a lot of time. So we can decide to compile only changed parts.

Inside /sitecore/system.web/ in web.config file we should set

<compilation optimizeCompilations="true" />

So final definition could look like:

<compilation defaultLanguage="c#" debug="false" targetFramework="4.5"  optimizeCompilations="true">

If you want to make your compilation more selective you can also set “batch” to false value. To read more about this: click

<compilation defaultLanguage="c#" debug="false" targetFramework="4.5"  optimizeCompilations="true" batch="false" >

You can also consider to use RAMDisk (example of software : click) for your compilation temporary files.

Then your definition for compilation would look like:

<compilation defaultLanguage="c#" debug="false" targetFramework="4.5"  optimizeCompilations="true" batch="false" tempDirectory="X:\TEMP\">

Pros of this feature you will see especially when you have old HDD rather than SDD.

Thanks to: http://blog.lavablast.com/post/2010/12/01/Slash-your-ASPNET-compileload-time.aspx

Publisher evidence (authenticode signature veryfication)

It is default mechanism which you can disable on your development environment. If you want to know more, please read here: click

Inside directories:

%windir%\Microsoft.NET\Framework\[version]\config\machine.config

%windir%\Microsoft.NET\Framework64\[version]\config\machine.config

you should update file “machine.config” and set in node “/coniguration/runtime” folowing value (patch of course would be better):

<generatePublisherEvidence enabled="false"/>

Sitecore Performance Counters

Counters store an information about number of different activities. They can be very useful but if you at particular moment do not need them, you can just turn off them (patch of course would be better).

<setting name="Counters.Enabled" value="false" />

Thanks to: https://sitecorebasics.wordpress.com/2011/03/17/all-about-sitecore-performance-counters-a-real-hero/

You can do it by yourself or use SIM “Configuration – Sitecore 8 – Development – Initialize Speed Booster” (here you can find configuration file: click).

Prefetch Cache

Prefetch cache is the basic cache for production environment so it is good to allocate as mach memory as it is possible for it. But what is good for production environment, not always also good for development environment.

Bigger prefetch cache also means longer Sitecore starting process.

You can change files inside App_Config/Prefetch/ directory.

Decrease size of cache in “configuration/cacheSize” nodes and numer of children in “configuration/childLimit”.

Thanks to: http://sitecoreblog.patelyogesh.in/2013/08/speedup-sitecore-startup.html

Initialize SPEAK Pipelines

Sitecore SPEAK has defined pipelines which precompile the SPEAK files.  If they will not be compiled on start, they will be compiled during the page loading. So it easy to decide to disable precompile pipelines on developer machine.

To disable this pipelines you should comment out (patch of course would be better):

// App_Config/Include/Sitecore.Speak.config

<initialize>
<!--  
<processor type="Sitecore.Pipelines.Initialize.PrecompileSpeakViews, Sitecore.Speak.Client">
 <Paths>/sitecore/shell/client/Business Component Library</Paths>
 </processor>
-->
 </initialize>

// App_Config/Include/ContentTesting/Sitecore.ContentTesting.config

<initialize>
<!--
<processor type="Sitecore.Pipelines.Initialize.PrecompileSpeakViews, Sitecore.Speak.Client" use="ContentTesting">
 <Paths>/sitecore/shell/client/Applications/ContentTesting</Paths>
 </processor>
-->
 </initialize>

Thanks to: http://kamsar.net/index.php/2015/02/sitecore-8-experience-editor-performance-optimization/

You can do it by yourself or use SIM “Configuration – Sitecore 8 – Development – Initialize Speed Booster” (here you can find configuration file: click).

Change mode of initialization for ApplicationPool

Inside directory

%windir%\System32\inetsrv\config

you will able to find file “applicationHost.config”. Inside that file in node “/configuration/system.applicationHost/applicationPools” you will find definitions of pools for your applications. You should set startMode to “AlwaysRunning”, so your configuration may looks like this one:

<add name="$NAME" autoStart="true" enable32BitAppOnWin64="false" managedRuntimeVersion="v4.0" managedPipelineMode="Integrated" startMode="AlwaysRunning">
 <processModel identityType="ApplicationPoolIdentity" pingingEnabled="false" />
 </add>

You can also change this from IIS and pool advanced configuration.

The second think you could change is in node “/configuration/system.applicationHost/sites”. Find your site and “application” definition, then add/set there an attribute “preloadEnabled” to “true”. Your configuration may looks like this one:

<site name="$NAME" id="6" serverAutoStart="true">
 <application path="/" preloadEnabled="true">
 <virtualDirectory path="/" physicalPath="$PATH" />physicalPath="$PATH" />
 </application>
 <bindings>
 <binding protocol="http" bindingInformation="*:80:$NAME" />
 </bindings>
 <applicationDefaults applicationPool="$NAME" />
 </site>

This setting makes your website always ready to display.

Thanks to : http://blogs.iis.net/wadeh/application-initialization-part-2

Disable Ilde Time-out Action in IIS

By default your iis terminate applications which are not in use for defined time. But when you are working on your application you definitely want to have your application ready all the time.

Find your application pool inside IIS and:

  • in recycle settings (first view) clear all checkboxes
  • in advanced settings find “Idle Time-out (minutes)” and set it to 0

Then go to the website advanced configuration (also in IIS) and change “Connection Time-out” to 0.

Restart IIS and your environment is ready.

Thanks to: https://dotnettimes.wordpress.com/2014/03/24/fixing-slow-initial-load-for-iis-web-site/

Disable Event Queue

You can disable some event queues because they are not required for developers use.

Just add the following line in “/configuration/sitecore/settings” node:

<setting name="EnableEventQueues" set:value="false" />

You can do it by yourself or use SIM “Configuration – Sitecore 8 – Development – Disable Event Queue” (here you can find configuration file: click).

Happy speeding up! 🙂

If you have other tips, please share them in comments – i will update post.

First in Poland Sitecore Meetup

20 may 2016 will go down in history as day of first in Poland Sitecore meetup.

I have a pleasure to be an organizer of this event. In cooperation with our sponsors (Coders.Center & Sitecore) we are trying to build community of Sitecore users in Poland.

On first meetup our speakers are going to talk about:

  • Sitecore XP – more than CMS – about platform capabilities in support of online marketing (Jakub Koba)
  • Sitecore xDB – Architecture and Configuration (Tomasz Juranek)
  • Sitecore & Gulp as a way of automatization in Siteore projects (Radosław Kozłowski)

If you want to be a part of this event here you can find more information:

Presentations from Meetup:

If you want to join to our community, here you are able to find more information:


Lucene Analyzers for Sitecore – how the tokenized content looks like?

Everyone who have worked with Lucene indexes in Sitecore probably asked one day  him self – “how my content looks after tokenization process?”.

The answer of course is different depending on the type of used analyzer. (About types of analyzers you can read here. I will not provide those information here because it is not in the scope of this post)

Few days ago one of my colleagues (Wojciech Urban – thanks for that!), found the very useful tool which provide us following information:

  1. how tokenized text looks like
  2. how get tokens which are equal to those inside Lucene index

< You can find this tool here >

How tokenized text looks like?

As you can see in the image you are able to insert any description and test the tokenization process results.

2016-03-26_17h08_40

You can also change types of analyzers – you can choose from the following list:

2016-03-26_17h11_13

With this tool, results of your queries would never surprise you again!

How to get tokens which are equal to those inside Lucene index?

If you need tokens – let say for do something with your search results you can do something like this:

// get the analyzer which you use
var analyzer = new StandardAnalyzer(Version.LUCENE_30);
// prepare StringReader object with your text inside
StringReader stringReader = new StringReader(text);
// get the tokens stream
TokenStream tokenStream = analyzer.TokenStream("defaultFieldName", stringReader);
while (tokenStream.IncrementToken())
   ITermAttribute termAtt = tokenStream.AddAttribute<ITermAttribute>();
   var term = termAtt.Term;
   // ...
   // ... do something with your term
   // ...
}